Shape and Proportion
On this page
Two vase silhouettes look almost identical, yet one feels heavier. The cause may be simple: a little more width, a lower shoulder, or a different tilt.
Compare overall relationships before inspecting local turns. This lesson uses proportion, direction and surrounding space to make shape differences easier to identify. The aim is to say what differs, and what you are comparing it with.
Start with a few reference points
Find the top, bottom, leftmost and rightmost points, then the main direction through the shape. A centerline helps with an approximately symmetrical vase. For a tilted leaf, that main axis should tilt too.
Width-to-height ratio describes width relative to height. Enlarging both dimensions equally preserves the ratio; changing only width changes the shape. You can measure with pixels, fingers or marks on paper. Use a consistent scale and viewing condition.
A and B have the same height, but B is wider. Do not start with decorative details around the rim. Compare the overall ratio, then locate the widest region and inspect how the shoulders turn into the neck. A bounding box can reveal an overall mismatch without proving that the contour inside it is accurate.
Empty space has a shape too
The hole inside a cup handle, a gap between a leaf and the table edge, or a wedge between two objects can each be seen as a shape. The object is often called the positive shape; the space around or between objects is negative space.
“Negative” does not mean unimportant. Looking at a familiar object can trigger an idea of what it ought to look like. Comparing the gaps on its two sides may reveal a difference that this familiar idea concealed.
Negative space also depends on framing. Put the same vase in a narrower frame and less space remains beside it. Keep the frame fixed when comparing these gaps.
Judge first, then overlay
Adjust the right-hand vase until you think its width matches the reference. Reveal the overlay, then switch to negative space and watch what happens around a widening object.
The reference vase stays fixed. Only the comparison vase changes width; its height stays fixed. Overlay checks the contours, while negative-space mode highlights the surrounding region. At a width ratio of 1.00 the contours coincide.
Overlaying the shapes aligns their centers, making departures easier to see. It checks an observation; it does not replace one. Make a judgment before revealing the answer so you can identify what you overlooked.
Only width changes in this experiment. In an actual image, check tilt and contour turns separately too. Two silhouettes can share the same overall proportions and still have different shoulders. One similarity score cannot replace these specific observations.
Worked example: draw this teapot, not a remembered teapot symbol
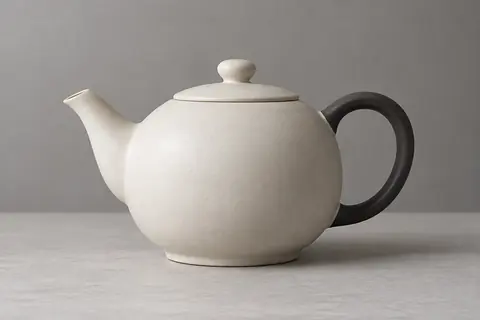
Begin with the combined outline of spout, body and handle. “Round belly plus handle” may produce a recognizable symbol while losing this object's proportions. The following silhouettes are structural exercises, not pixel-by-pixel tracings of the photograph.
First, establish separate references for whole and part. Locate the leftmost spout, rightmost handle, highest knob and lowest base. Then compare the body alone. A bounding box that includes handle and spout cannot supply the width of the belly.
Second, compare important heights. Where is the spout opening relative to the lid? At what level does the handle join the body? Is the widest part above or below halfway? These relationships provide firmer guidance than following a contour while guessing each next mark.
Third, check direction independently. B changes width only; C tilts the whole silhouette. Both cannot be repaired by making the body narrower. Compare the body's main axis and the spout's angle with a true horizontal or the paper edge. Do not assume the object is perfectly upright.
Fourth, examine the handle opening. D emphasizes that negative shape. Is it round, elongated or an asymmetric crescent? Is its upper part wider than its lower part? Compressing the opening can make the handle heavy even when its outside bounds stay unchanged. Inspect opening, outer contour and both attachment points together.
Finally, refine local curvature. Identify the shoulder's quicker turn, the base's closure and the spout's taper. Once the main references are stable, a local correction need not disturb the whole drawing.
Mark the observation sequence on the image
A shows the whole object. B adds an outer frame that includes spout and handle, not just body width. C marks 1 spout, 2 top, 3 outer handle and 4 base, with horizontal and axial references. D isolates the handle opening. The frame is an observation guide and the silhouette a simplification, not a precise measurement of the generated photograph.
Turn a vague impression into a specific correction
| Observation | Possible correction | Reference to retain |
|---|---|---|
| Body height is close, but width is excessive | Bring the sides inward | Top, base and axis |
| The handle feels blocked | Reconsider the enclosed space, not just stroke thickness | Outside edge and attachments |
| The spout looks abruptly stuck on | Check its origin, direction and gradual taper | Body contour and opening position |
| The drawing is tidy but unlike the subject | Find actual asymmetry and characteristic turns | Overall proportions; avoid random distortion |
Repeatedly tracing an edge usually makes it darker without repairing its reference. Describe one relative difference, change that part, then check the whole again.
Transfer the method to icons, letters and figures
Two icons with equal outer bounds need not have equal visual weight: a thicker, more filled-in icon occupies more area. Letter counters and spaces between letters are negative shapes too. In a standing figure's silhouette, gaps between arms and torso or between legs can help check pose, though they do not replace later study of anatomy.
For accurate copying, use the reference to judge differences. For a caricature, a wider body or smaller handle may be intentional. Establish the purpose before deciding whether a shape needs correction.
Try a leaf: width or veins first?
A is the target silhouette, B an observation drawing, and C adds a box and a horizontal guide to A. Ignore veins. Have B’s top and bottom moved? Which side differs most? Propose one local edit and a follow-up check.
Decide first, then reveal the explanation
The endpoints and left boundary match; B bulges farther to the right. Bring that contour inward, especially from the middle toward the bottom, rather than scaling the entire leaf down. Recheck the widest point’s height, endpoints and surrounding spaces. Vein detail cannot repair a silhouette. C’s guides do not require symmetry.
Two short checks
Situation one: Two leaf drawings have equal bounding-box width and height. Must their contours match?
Show a possible explanation
No. The box constrains only the extreme positions. The leaf tip, indentations and contour turns may still differ. Use the box for the overall relationship, then inspect the axis and significant turns.
Situation two: Two cups have equal-sized bodies, but one handle looks tighter. What can you compare besides the handle itself?
Show a possible explanation
Compare the empty region enclosed by the handle. Is it narrower, flatter, or pinched near the top? Also compare where the handle joins the body. This turns an uneasy impression into a specific relationship.
Make an observation you can act on
“This shape looks bad” gives little direction. “Its height is unchanged, its width has increased, and the gap on the right has narrowed” can be checked. This is the value of careful observation: turning an impression into a comparison.
Optional practice: choose scissors or a handled cup. Draw only the gaps inside and around it, then return to the object's contour. Attractive linework is not the goal; observing this object instead of a remembered symbol is.
Further reading: Ctrl+Paint: Negative Space, Getty: Elements of Art. The composition lesson returns to these spaces as deliberate parts of a layout.