Space and Perspective
On this page
A picture has no actual front-to-back distance, yet it can suggest a corridor, a row of trees or objects arranged on a table. Several visual cues support that reading.
Recognize overlap and relative size first, then connect perspective to the viewing position. You do not need to draw complex architecture. The goal is to identify why an image suggests depth and what assumptions its cues require.
Overlap establishes order
When a sphere covers a corner of a box, we usually read the sphere as nearer. The hidden object need not be completely visible for the relationship to make sense.
Overlap mainly suggests order, not a distance in centimeters. A flat collage can create the same cue. We are examining what the image communicates.
Overlap in A clarifies front-to-back order. B uses the projected size of equal objects to suggest distance. The cues can work together, but they provide different information.
Smaller does not always mean farther
Under the same viewing conditions, objects of equal real size generally appear smaller as distance increases. Identical streetlights along a road are a useful example.
If real sizes differ, a nearby coin may occupy more of the image than a distant building. “Small in the picture” cannot simply be translated as “far away.” Familiar sizes, overlap and ground relationships can provide additional evidence.
Perspective begins at the viewpoint
Imagine the picture as a fixed window. Straight lines between the eye and objects intersect that window, locating their projections. Move the viewpoint and those intersections change.
In a familiar scene with level ground, the horizon corresponds to eye level. Parallel lines sharing one spatial direction can converge toward one vanishing point in the projection. Different directions generally have different vanishing points. Edges parallel to the picture plane do not meet at a finite point in the image.
Check eye height with a box
In the one-point view below, the box's front face is parallel to the picture plane. Its depth edges head toward one vanishing point. The camera stays level and only its height changes.
Overlap establishes order. Size mode places equal-sized panels at different distances. Perspective mode raises a level camera and shows how the box and floor move relative to the horizon. Edges parallel to the picture plane remain parallel.
At the height of the box top, that top surface is almost compressed into a line. Raise the eye and more of the top becomes visible. Here the horizon remains in the same place within the image because the camera does not tilt and the projection settings remain fixed. Raising a phone while tilting it downward changes two things, so it is a different experiment.
Ground lines extending into depth approach each other. Lines running horizontally across the image remain parallel, although their projected lengths shrink with distance. Identify a line's direction in space instead of making every line head toward the image center.
Read three kinds of depth evidence in a corridor
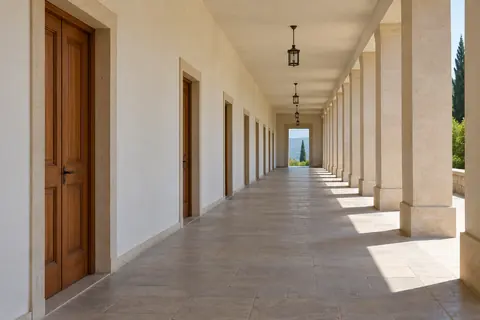
Before adding guide lines, identify visible evidence: nearer doorways are larger, later doorways become smaller, the right-hand columns overlap, and floor, wall and ceiling edges narrow into the distance. These cues support one another; none must establish the whole space alone.
Follow the upper edge and base of the left wall and the direction of the columns. They generally recede toward the same distant region. The outline of a distant mountain is not the horizon line of a perspective construction. Nor does a long horizontal mark automatically qualify. A perspective horizon relates to eye height and horizontal spatial directions; a mountain silhouette describes particular terrain.
This generated reference is useful for observation, not exact measurement. The next diagram uses a deliberate construction so the steps can be checked.
Worked example: construct a room you can furnish
A: choose the viewing conditions. The camera is level and faces the back wall. Draw a horizon, place the depth-direction vanishing point on it, and add a rectangular back wall parallel to the picture plane. Extend its corner directions outward to the frame to establish walls, ceiling and floor. A vanishing point organizes directions; it does not order you to put the artistic focal point there.
B: place objects in that space. Add doors along the left wall. Their vertical edges remain vertical; their top and bottom edges recede in the wall's depth direction. More distant doors appear smaller and the gaps compress. Equal widths and gaps measured mechanically on the page would ignore their different depths.
C: diagnose an inconsistent construction. The top of the right-hand doorway heads in the wrong direction for its wall. Bricks, wood grain and shadows will not fix this structural error. Identify which spatial direction the edge belongs to before correcting it. Do not pull every edge toward one point.
Construct equal depth: four floor tiles
Assume a level floor and a level camera facing the row. Crosswise edges remain horizontal; the sides recede toward V. A is the projection of a rectangular floor patch: AB is near, CD far. Divide its real depth into four equal parts, not its pixel height.
B: join A to C and B to D. Their intersection M is the projected center of the rectangle. Draw a horizontal through M, parallel to AB, to halve the real depth. M is visibly closer to the far edge in the picture because depth is compressed.
C: repeat the diagonal-intersection construction inside each half to obtain four equal-depth tiles. The thin dashed diagonals show this second pass. D instead spaces the horizontal lines equally on screen; it cannot represent equal-depth tiles under these conditions.
The same construction works on a rectangular wall: find its center with diagonals, then split along the other edge direction. In two-point perspective, that split generally aims at the appropriate vanishing point rather than staying horizontal. This resolves repeated spacing; door width and height still need their own consistent directions.
Why does a rotated box often need two vanishing points?
The previous back wall and box front are parallel to the picture, so their horizontal edges remain horizontal while depth edges recede. Rotate the box on the floor and both horizontal edge families usually recede, each toward its own vanishing point. With a level camera, the vertical edges remain vertical: the familiar two-point arrangement.
The points may be far outside the frame. Forcing both onto the paper often makes a near corner look unusually acute, with rapid recession on both sides. Check viewpoint and projection instead of counting visible dots. Looking upward at a tall building can make vertical edges converge as well; that changes the camera conditions.
Depth does not always require ruler construction
| Cue | What it can support | Caution |
|---|---|---|
| Overlap | Front-to-back order | It does not directly give a distance |
| Size change of known equal objects | Relative distance | An unknown small object need not be far away |
| Denser texture and compressed intervals | A surface receding in depth | Repeated objects still need consistent directions |
| Reduced distant detail and contrast | Distance under common atmospheric conditions | Air, lighting and material affect this; indoor distance need not turn everything blue |
For misty mountains, overlap, scale and weaker distant detail can organize depth without imposing straight architectural lines everywhere. Choose tools that match the subject's structure.
Try a row of posts: what changed at the back?
The posts are equally tall on one level plane. The camera is level and its height equals theirs. A is the reference; B changes one post; C adds a guide to A. Does B still fit the conditions? Cite visible evidence, then name a condition under which it could work.
Decide first, then reveal the explanation
B lifts the distant post’s top above the shared horizon without moving its base. When post height equals eye height, every top projects onto the horizon, as in A and C. B could represent a taller post or a different support plane, but then the original equal-height, level-ground claim must change.
Two common misreadings
Situation one: In a photograph, a nearby small cup is still smaller than a distant large jug. Does this violate perspective?
Show a possible explanation
No. A direct near-versus-far size comparison requires equal real dimensions, or an allowance for their difference. Projected size depends on both size and distance.
Situation two: The upper and lower edges on the front of a box do not converge in a one-point drawing. Should they be changed?
Show a possible explanation
Not if that face is parallel to the picture plane. Its horizontal edges remain parallel. The separate group of edges extending into depth approaches its vanishing point. Identify which spatial direction each edge belongs to.
Optional practice: look at a box from table height, then from above it. Keep your gaze level and compare the visible top, overlap and edge directions. Then tilt your gaze and notice which condition has changed.
Further reading: Getty: From Foreground to Background, National Gallery: Vanishing Point.